
Security operations or SecOps combines IT processes and security teams to prevent and mitigate attacks. Having the right degree of visibility into your IT systems is key to make this work. There is an entire industry of security products that help enterprises towards this end, by collecting and analyzing a firehouse of raw data that can be used to infer security relevant insights.
In this blog post, we'll show you an end-to-end example of how you'd build such a solution using Feldera. Consider using Feldera if you'd prefer to build and iterate quickly on your own SecOps analytics.
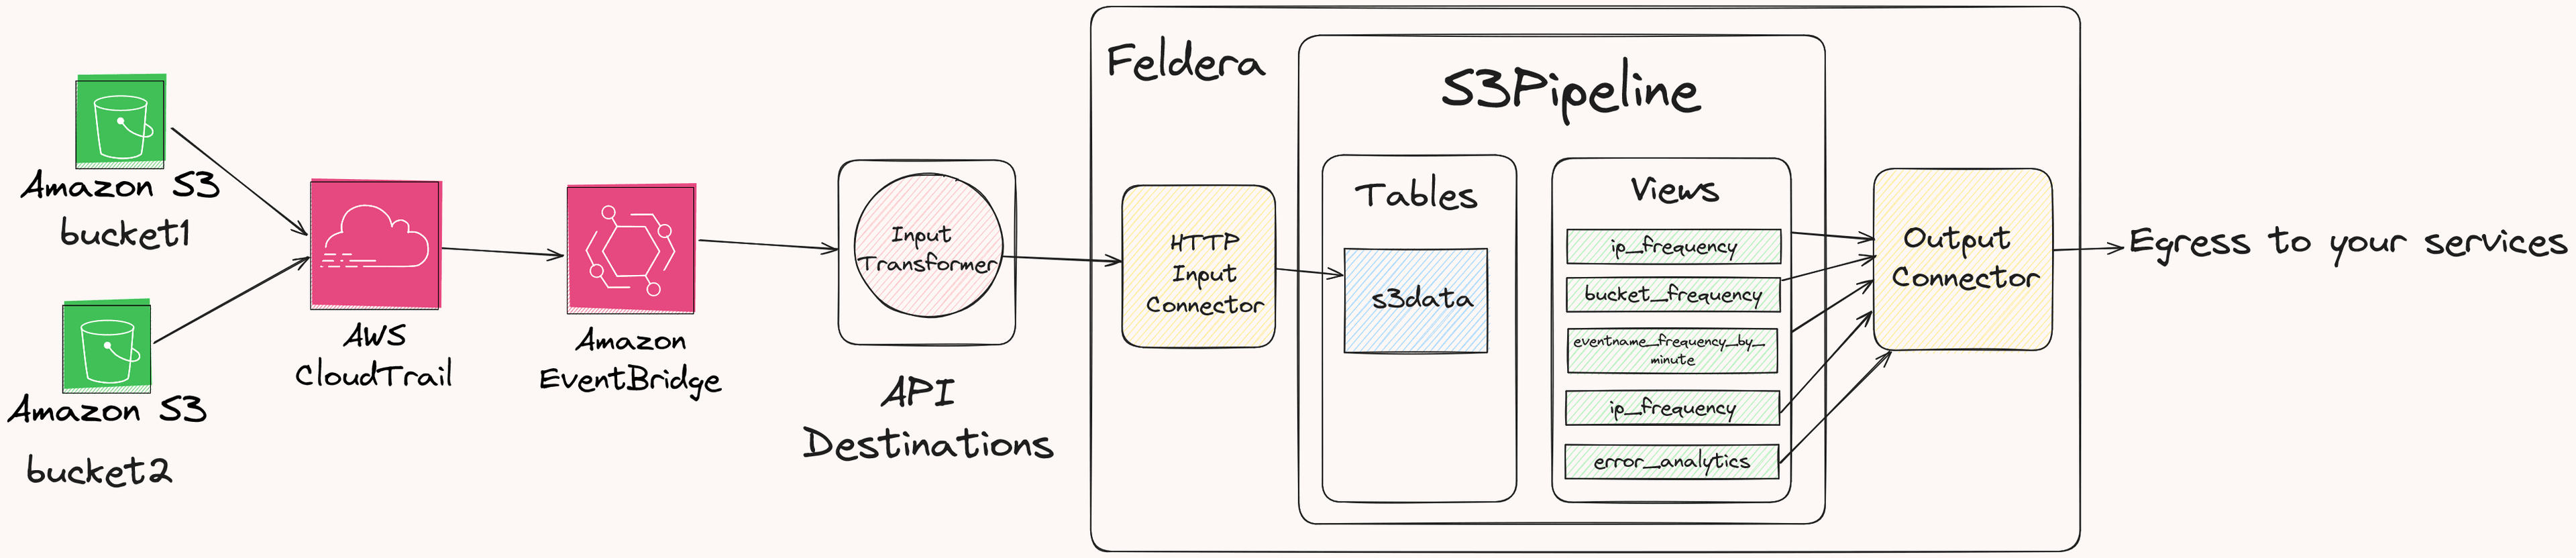
We'll analyze event accesses to AWS S3 in real-time. The goal is to gather insights on which users are accessing sensitive buckets, and whether they have the right permissions to do so. Thanks to Michael Gasch for suggesting this idea!
Our ingredients for this recipe will be:
- AWS CloudTrail, a service that helps log events for configured AWS Services. For example, if enabled for S3, CloudTrail generates a continuous log of events that records every operation against your S3 bucket. These events note the users/accounts, the bucket name, the type of operation and more.
- AWS EventBridge, a serverless service that uses events to integrate different applications. It makes it extremely easy to pick up CloudTrail events and route them to...
- Feldera, where we will analyze these events using SQL in real-time. In doing so, we'll demonstrate how Feldera can interoperate with a diverse ecosystem of data sources like EventBridge, run complex analytics in real time and work with data sources that reside in different administrative domains.
We'll set this up in three steps. First, we'll configure CloudTrail and S3. Then we'll prepare a Feldera pipeline that is ready to receive events. Then we'll use EventBridge as the integration point. We will use Feldera to aggregate and analyze S3 access patterns by IP address, buckets, and even by time. In future blogposts, we'll also show how to integrate such analytics with historical data from your lakehouse.

When we are all done, we can see the data updating live in the views.

Set up CloudTrail for two S3 buckets
Go to your AWS Console, then search for CloudTrail (or go to https://<region>.console.aws.amazon.com/cloudtrailv2/home). Click on Create a trail, give the trail a name like tutorial-trail, and complete the form. We will refer to this name later.
Next, go to your AWS S3 console (e.g. https://<region>.console.aws.amazon.com/s3/get-started). Click on Create Bucket, give the bucket a name (which we will reference later), and complete the form. Once you've created the bucket, go back to the list of buckets (https://<region>.console.aws.amazon.com/s3/buckets?region=<region>), pick the bucket you just created, go to Properties, and under AWS CloudTrail data events, choose Configure in CloudTrail. You can see these steps in detail here.
Repeat these steps for two different S3 buckets.
Setup Feldera
With CloudTrail and S3 in place, let's login to the Feldera Cloud Sandbox. We'll start by creating a SQL program. Add the following program that will eventually receive CloudTrail events and compute some views on it in real-time.
CREATE TABLE s3_data
  (
     account             STRING,
     eventname           STRING,
     eventtime           STRING,
     eventsource         STRING,
     sourceip            STRING,
     useragent           STRING,
     eventid             STRING,
     eventtype           STRING,
     bucketname          STRING,
     id                  STRING,
     requestid           STRING,
     region              STRING,
     usertype            STRING,
     userarn             STRING,
     userprincipalid     STRING,
     useraccountid       STRING,
     useraccesskeyid     STRING,
     sessioncreationdate STRING,
     errorCode           STRING,
     errorMessage        STRING
  );


CREATE VIEW ip_frequency AS
SELECT
    sourceip,
    count(sourceip) as frequency
from s3_data
group by sourceip;

CREATE VIEW bucket_frequency AS
SELECT
    bucketname,
    count(bucketname) as frequency
from s3_data
group by bucketname;

CREATE VIEW eventname_frequency_by_minute AS
SELECT
  *
FROM
  (
    SELECT
        eventname,
        count(eventname) as ct,
        eventminute
    FROM
    (
        SELECT
            minute(
                    -- convert the timestamp to Feldera TIMESTAMP literal then cast to TIMESTAMP type
                    cast(
                        trim(
                            trailing 'Z'
                            FROM
                            replace(eventtime, 'T', ' ')
                        ) as TIMESTAMP
                )
            ) as eventminute,
        eventname
        from s3_data
    )
    GROUP BY (eventname, eventminute)
    ) PIVOT (
        SUM(ct) FOR eventname IN (
        'GetObject' as getobject,
        'HeadObject' as headobject,
        'ListObjects' as listobjects,
        'PutObject' as putobject
    )
);

CREATE VIEW errors AS
SELECT
   substring(
        userarn from position('/' in userarn) + 1
   ) as username,
   region,
   bucketname,
   sourceip,
   eventname,
   cast(
        trim(
            trailing 'Z' FROM
            replace(
                eventtime, 'T', ' '
            )
        ) AS TIMESTAMP
   ) as eventtimestamp,
   errorcode,
   errormessage
FROM s3_data
where errorcode != '' or errormessage != '';

CREATE VIEW error_analytics AS
SELECT
    username,
    sourceip,
    count(*) as frequency,
    TUMBLE_START(
        eventtimestamp,
        INTERVAL '5' MINUTES
    ) as tumble_start_time
FROM errors
GROUP BY
TUMBLE(
    eventtimestamp,
    INTERVAL '5' MINUTES
), username, sourceip;
Setup a Feldera API Key
We now need to make sure EventBridge has credentials to stream data to your Feldera pipeline.
To do so, click on your profile on the right and click Manage API Keys. Generate the key after giving it a name like aws-eventbridge-demo. Copy the key somewhere and keep it safe.
Setup EventBridge
Go to the EventBridge console at https://<region>.console.aws.amazon.com/events/home?region=<region>#/apidestinations. Click on Create API destination and give it a name (e.g., feldera-demo).
Next, set the API destination endpoint to the ingress URL for the Feldera pipeline you created above: https://try.feldera.com/v0/pipelines/s3pipeline/ingress/s3_data. Here,s3pipeline is the pipeline name, and s3_data is the table you created above. Then configure the rest of the API destination as follows:
- Set the HTTP method to
POST - In the connection type, select
Create a new connection - Set the connection name:
TryFelderaConnection - Set the destination type as
Other - Set the Authorization type as
API Key - Set the API key name as:
Authorization- Set the Value as:
Bearer <feldera-api-key>, using the API key contents that you'd saved earlier.
- Set the Value as:
- Click on
Create
Create an EventBridge Rule
- Go to:
https://<region>.console.aws.amazon.com/events/home - Click on Create Rule
- Give it a name:
s3logstofeldera - Select the default Event bus
- Set the rule type to:
Rule with an event pattern - Set the event source to:
Other - Set the creation method to Custom pattern (JSON editor)
- Set the event pattern to:
{
  "source": ["aws.s3"],
  "detail": {
    "userAgent": [{
      "anything-but": ["cloudtrail.amazonaws.com"]
    }]
  }
}
Click on Next, then
- Set Target type as
EventBridge API destination - Select
Use an exisitng API destination - Select the previously created API destination:
ToTryFeldera - For query string parameters
- Set Key to:
format - Set Value to:
json
- Set Key to:
- Click on additional settings
- Set the configure target input to:
Input transformer - Click on configure input transformer
- Set the Sample event type to: AWS events
- Search for S3 in the Sample events input section, and select: AWS API Call via CloudTrail - Simple Storage Service (S3)
- You should see a sample event where the source field says "aws.s3".
- Set the target input transformer as follows:
{
  "account": "$.account",
  "bucketName": "$.detail.requestParameters.bucketName",
  "errorCode": "$.detail.errorCode",
  "errorMessage": "$.detail.errorMessage",
  "eventID": "$.detail.eventID",
  "eventId": "$.detail.eventID",
  "eventName": "$.detail.eventName",
  "eventSource": "$.detail.eventSource",
  "eventTime": "$.detail.eventTime",
  "eventType": "$.detail.eventType",
  "id": "$.id",
  "region": "$.region",
  "requestID": "$.detail.requestID",
  "sessionCreationDate": "$.detail.userIdentity.sessionContext.attributes.creationDate",
  "sessionMFA": "$.detail.userIdentity.sessionContext.attributes.mfaAuthenticated",
  "sourceIP": "$.detail.sourceIPAddress",
  "time": "$.time",
  "userARN": "$.detail.userIdentity.arn",
  "userAccessKeyId": "$.detail.userIdentity.accessKeyId",
  "userAccountId": "$.detail.userIdentity.accountId",
  "userPrincipalId": "$.detail.userIdentity.principalId",
  "userType": "$.detail.userIdentity.type",
  "useragent": "$.detail.userAgent"
}- Set the template as follows:
{"insert":{"account":"<account>","time":"<time>","eventName":"<eventName>","eventTime":"<eventTime>","eventSource":"<eventSource>","sourceIP":"<sourceIP>","useragent":"<useragent>","eventId":"<eventId>","eventType":"<eventType>","bucketName":"<bucketName>","id":"<id>","requestID":"<requestID>","eventID":"<eventID>","region":"<region>","userType":"<userType>","userARN":"<userARN>","userPrincipalId":"<userPrincipalId>","userAccountId":"<userAccountId>","userAccessKeyId":"<userAccessKeyId>","sessionCreationDate":"<sessionCreationDate>","sessionMFA":"<sessionMFA>", "errorCode": "<errorCode>", "errorMessage": "<errorMessage>"}}Note, we use the minified version for API destinations because Feldera's HTTP input currently accepts NDJSON (newline-delimited JSON) -- we do this so you can send a batch of JSON events at a time. See here to learn more.
- We define an input transformer to keep the Feldera schema simple. This transformation can be done from within Feldera once JSON support lands.
- Click confirm and create the Rule.
Let's generate some test data
We'll simulate some users accessing S3 buckets next. We'll create two users with differing permissions.
Create three IAM users
- Go to AWS Console IAM Users
- Click on Create User
- Set the User name:
elliotalderson - In Set permissions, create a group: Select the AmazonS3FullAccess policy and give the group a name:
s3users - Create the user
- In the user details, create an access key
- Select Command Line Interface (CLI)
- Check the Conformation (I understand) part
- Give it a tag, describing what the access key is for
- Copy the access key
- Copy the secret access key
- Click done
- Go to create another user:
mrrobot - Set the group to:
s3users - Create the user
- Go to create another user:
terminator - In Set permissions, create a group: Select the AmazonS3ReadOnlyAccess policy and give the group a name:
s3readonly - Create the user
- Create an access key for both
mrrobot andterminate, and copy the information
Configure AWS CLI
- Install AWS CLI:
sudo apt install awscli - Configure the profiles for the previously created users
- Run:
aws configure --profile <username> - Paste and set the access key and secret access key
Access the S3 objects using the different IAM users
Create a new file s3-accesses.py and run it python3 s3-accesses.py
import random
import os
import sys

PROFILES = ["elliotalderson", "mrrobot", "terminator"]
BUCKETS = ["bucket-1", "bucket-2"] # change to match the created bucket names
SUBCOMMANDS = ["ls", "cp"]

def select_profile():
    return random.choices(PROFILES, weights = [50, 30, 20], k = 1)[0]

def select_bucket():
    return random.choice(BUCKETS)

def run_command():
    cmd_type = random.choice(SUBCOMMANDS)
    profile = select_profile()
    bucket = select_bucket()
    filename = ""

    if cmd_type == "ls":
        command = subprocess.Popen(["aws", "s3", cmd_type, "s3://%s/" % bucket, "--profile", profile], stdout=subprocess.DEVNULL)
    else:
        filename = "file%s.txt" % str(random.randint(0, 10000))
        subprocess.run("echo hello > %s" % filename, shell=True)
        command = subprocess.Popen(["aws", "s3", cmd_type, filename, "s3://%s/" % bucket, "--profile", profile] stdout=subprocess.DEVNULL)
        command.wait()

    print(" ".join(command.args), ": return code: ", command.returncode)

    if filename != "":
        subprocess.run(["rm", filename])


runs = int(sys.argv[1]) if 1 < len(sys.argv) else 20

print(f"generating {runs} data points")

for _ in range(runs):
    run_command()
Now go back to the Feldera Console and see the output view
- Go to: https://try.feldera.com visit the s3pipeline
- Click on Change Stream tab, enable the views
ip_frequencyshows the source IP addresses and total access countbucket_frequencyshows the bucket name and total access counteventname_frequency_by_minutepivots on the different types of S3 events and shows their frequency per minuteerrorsshows rows that contain an error messageerror_analyticsshows analytics on the errors for a tumbling window of 5 minutes
Conclusion
If you're on AWS, you can conveniently use Feldera and EventBridge to analyze CloudTrail events from your data sources of choice, in real-time.
More broadly, we showed how Feldera can be used to engineer SecOps use cases, consuming data from diverse sources across administrative domains, and analyzing these results in real-time to produce insights. We've worked on a couple of these use cases already and are excited to see what our early users are coming up with. Don't hesitate to connect with us below to learn more.